
Well here they are! Just in time for the summer to be over too!!
..dick
Right so let's get to it! For those of you who may have missed the original post about this, I wanted to build a couple of nice and different benches for purposes of maximum chilling enjoyment in my backyard during BBQ's etc without having to break the bank..
Here's what I found on the interwebz:
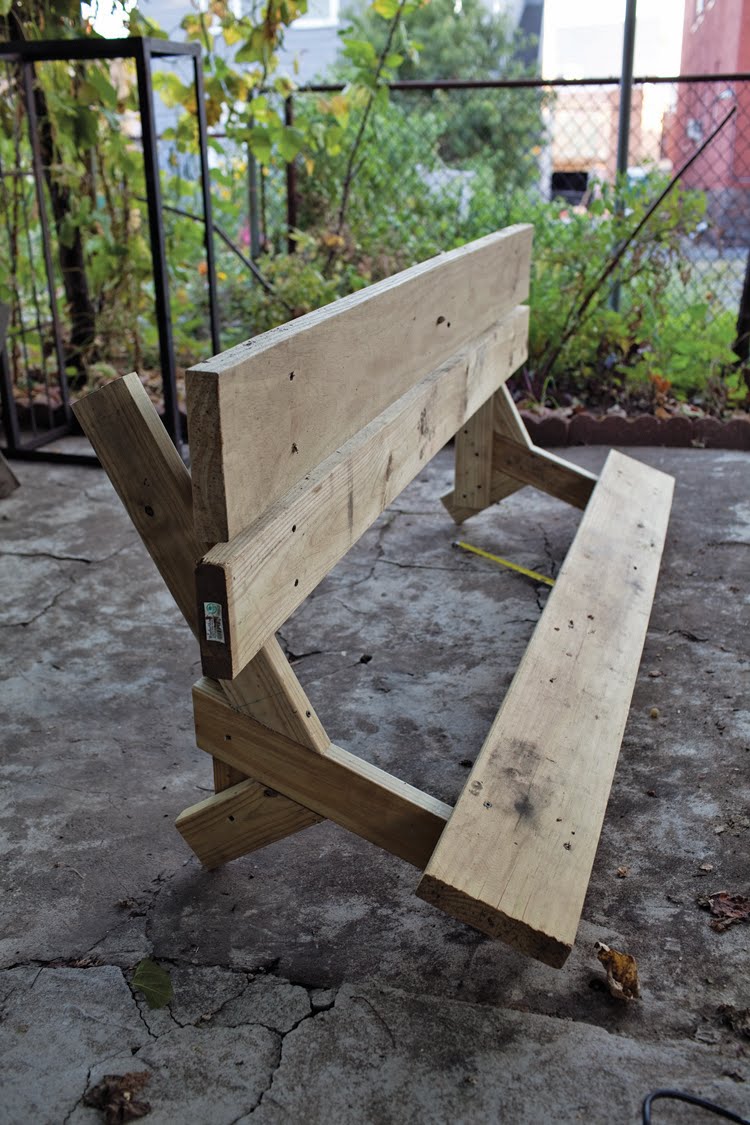
 ..and this is how it eventually turned out:
 ..and this is how it eventually turned out:
Again, I had no instructions to go off of. I also wasn't looking to go crazy with making it all perfect and smooth. Just went off the photos and did a little trial and error. People seemed interested in checking out a DIY for themselves so here it is!
First thing I did was figure on how much wood I would need to build two 6' benches. I ended up getting a bunch of 12' length pieces of treated lumber from Home Depot and cutting them in half..
PLEASE NOTE: Home Depot will not cut these in house for you since they have strict guidelines for air safety there. Please keep this in mind when A) Transporting the wood home if all you have is a sport compact like my dumbass and B) be sure to do all the cutting outside or in a well vented area..
Here's what I had hanging out of my car with a blinker taped to the end of it:
2 - 2" x 8" x 12"
2 - 2" x 8" x 12"
1 - 2" x 6" x 12"
a bunch of - 2" x 4" x 12's (or 8'??)
a bunch of - 2" x 4" x 12's (or 8'??)
I don't remember how many 2" x 4"'s I got originally but there was at least like 6 or 7. They also could have been 8 footers now that I think about it.. I also would have gone for the wider 10" or 12" width for the main seating and backing but yo, there's no way my ass was budging it on my own! Shit was wicked heavy and expensive too. Furthermore, treated lumber has this wet chemical texture to it making it slippery. Imagine opening a fresh package of twinkies..
SHIT!! God I hate making associations like that. Now I need to eat one otherwise I'll never stop thinking about it. It's like getting Don't You Want Me Baby stuck in your head..
Right, moving along then..Here's an exploded view of the bench before assembly:

The backing and seating is a mix of 4", 6" and 8" wide. Here's a breakdown of the support pieces:

What I highly recommend is building yourself a prototype of sorts from some scrap wood to A) double check that my instructions aren't totally retarded, B) Prevent yourself from wasting time and money due my janky instructions as mentioned in 'A', C) To make sure you enjoy the comfort and feel of the angles I used. As you can imagine a lot of this is up to your own interpretation. Finally, C) To use up that scrap wood you've had sitting around forever but have held onto cause you knew you'd need it eventually and if you tossed it you'd either feel guilty or just end up needing it after all..
Here's my prototype:

You'll notice that the angle on the front leg piece is off. I was able to compensate for this on the final piece. I also cut the legs extra long and slowly chopped them down til I got it the way I felt seemed best height and angle wise. It also works as a spare place to sit so long as you or your guest don't mind balancing or leaning it up against a pole..
Here's the prototype next to a fully assembled support:

Okay, enough of this measure twice, cut once bullshit- time for assembly!

Lay part D down on the floor and place part W on top as pictured. You'll want to place it 14 and a half inches away from the front bottom. Screw them together..

Then place piece M on top of D and next to W, follow the measurements pictured, then follow that with piece C and screw them shits together..
Repeat once more and you're just about set with both supports:

At this point it's a really good idea to check to make sure both supports angles and placement of pieces match appropriately..
I used some gnarly green coated deck screws for assembly. Here's how I screwed everything together on the outside. I only used 5 screws to keep it clean:
I used some gnarly green coated deck screws for assembly. Here's how I screwed everything together on the outside. I only used 5 screws to keep it clean:

Only because I knew that I was going to haphazardly toss a bunch on the inside where no one could see:

Note to self, get the right length screws next time!
Next is tossing the seating and back slats between the two supports. I placed them about 9" from each end:
Next is tossing the seating and back slats between the two supports. I placed them about 9" from each end:

It helps having an extra set of hands to help out with this since it can be a PITA by yourself..
PLEASE NOTE: If you're concerned with the wood slightly sagging (which mine hasn't yet), an addition support could be added to the middle as well as placing both supports slightly closer together..
PLEASE NOTE: If you're concerned with the wood slightly sagging (which mine hasn't yet), an addition support could be added to the middle as well as placing both supports slightly closer together..

I put 1 inch of space between each slat..

Now that the bottom is done it's time to flip the bitch on it's back and take care of the last two pieces:
Once that's all set, take a long straight edge like this awesome 4' worn out ruler I found in the street and mark about 1 inch off the bottom of the legs like so:

This way it'll provide the bottom of the legs with more surface area to help the bench sit firmly on the ground..

And we're all done! Repeat once more and you'll have a nice chill area in your backyard:

..add a few bodies, calm breeze, charcoal crusted hands flipping sizzling meat and veggies over a kickin' flame and you're gtg! Some refreshments in the form of suds and some such would also go well with this combination..
Now I just need to build an appropriate table to tie the whole thing together. Oh and not to mention the rad grill I built from a 30 gallon oil drum! Just need to add the finishing touches to it before posting some snaps of it. Here's a few photos tooommmeeeee took of me when I was dicing it open:
Now I just need to build an appropriate table to tie the whole thing together. Oh and not to mention the rad grill I built from a 30 gallon oil drum! Just need to add the finishing touches to it before posting some snaps of it. Here's a few photos tooommmeeeee took of me when I was dicing it open:


Anyways, more about that later..
I hope this DIY post comes in handy for those who were interested! Sorry if it's all a bit wonky but something tells me if you're seriously thinking about building yourself a set, you're more than capable of dealing with my janky ass instructions..
Send me some snaps if any of you build one :-)
I hope this DIY post comes in handy for those who were interested! Sorry if it's all a bit wonky but something tells me if you're seriously thinking about building yourself a set, you're more than capable of dealing with my janky ass instructions..
Send me some snaps if any of you build one :-)


3 comments:
I love you.
I need some lawn furniture, so I'm really thinking about building a pair of these. I gots the time, the space, a bitchin trailer for hauling the wood home in, and I've been meaning to hit up Harbor Freight for some power tools anyhow…
Dou you think you could post some pics of people sitting on them?
nice! gotta borrow a truck and get to the lowes.
the DIY posts are one of the best things about this blog. mas mas mas!
Post a Comment